Tag Archives: white chocolate

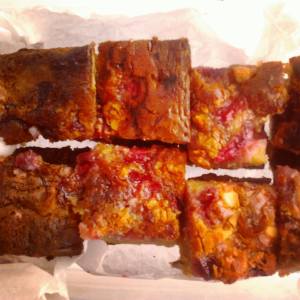
Rich Raspberry and White Chocolate Brownies

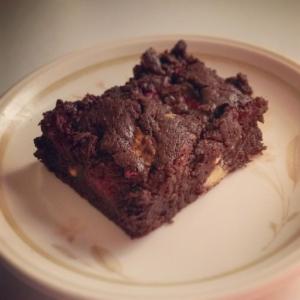
Rich Raspberry and White Chocolate Brownies

Brownies, filled with love (well, raspberries and chocolate)!

I’m not a fan of Valentine’s Day, but I’m not really traditionally romantic. I don’t like flowers all that much, I don’t particularly like having stuff bought for me and the idea of being ‘spoiled’ is something I can’t get my head round – after all, something that’s spoiled is a bad thing, right? The most ‘romantic’ things that have ever been done for me, gestures filled with emotion at a time when I really needed to feel loved and cherished in some way, have all been done for me by friends. I don’t think you should need a special day to show somebody that you love them, or if you do want to show somebody how much they mean to you I don’t think that person needs to be a romantic partner. I mostly show people how much they mean to me with food – cooking their favourite meal, baking something using their favourite ingredient or making dinners they can chuck in their freezer  to use when their time is needed for something more important than cooking. If you did want to show somebody how much you care, I think these brownies are a pretty good place to start.

Rich Raspberry and White Chocolate Brownies

Ingredients:

  • 250g butter
  • 200g dark chocolate, finely chopped
  • 200g caster sugar
  • 160g soft brown sugar
  • 65g plain flour
  • 80g cocoa powder, sifted
  • 1 tsp baking powder
  • 4 eggs
  • 150g raspberries
  • 100g white chocolate, chopped into chunks

Heat your oven to 180C and line a tin (approx 25x20cm) with foil (leave it hanging out of the tin a bit as you’ll be able to use it to lift the brownie out once cooled). In a medium sized saucepan, gently melt the butter until liquid but not browned. Turn off the heat and add the chopped dark chocolate, stirring until melted. Add the sugars and continue to stir until well combined. Next add the flour, sifted cocoa and baking powder and mix well so that no patches of dry ingredients remain. Crack the eggs into a mug or bowl and lightly beat them before pouring into the chocolate mix and giving the whole thing a big stir so it’s all well combined and glossy.

Pour the brownie mixture into the prepared tin and spread it out evenly so it’s right in the corners. Scatter the raspberries over the surface, followed by the white chocolate chunks. Use a teaspoon to sort of nudge the raspberries and chocolate into the brownie mix so that they’re nestled and smothered into the raw brownie mix. I suppose you could just add the fruit and chocolate to the brownie mix before you pour it into the tin, but by doing it this way you should avoid everything just sinking to the bottom as it cooks. Bake in the oven for 25-35 minutes – the brownies are done when the top is set and firm but a skewer inserted still has a little gunge clinging to it – brownies should always have a bit of goo to them even when cooled, and the abundance of fruit in these helps them stay incredibly moist. Remove from the oven and allow to cool completely in the tin, before lifting out and cutting into squares. OR you could serve them, still a little warm, with some pouring cream or ice cream as a lush dessert to end a special meal.

For a very different kind of brownie recipe click here. Or perhaps white chocolate in my blondies might tickle your fancy.
Totally Chocolaty Birthday Cake

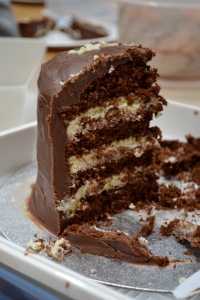
Totally Chocolaty Birthday Cake

Four layers of chocolate sponge, sandwiched with white chocolate buttercream and smothered in chocolate ganache

Judging by how many birthday cakes I’ve been asked to make in the last few weeks, spring really does get everyone’s sap rising! Anyway, the lovely Natasha Bailie (parental types should check out her blog, the milkstand) asked me to make a cake in honour of her baby boy’s first birthday. The babies attending Max’s birthday party will be having something a little kinder to young tummies and teeth, but the grown ups are getting the big-fat-birthday-cake experience with this totally chocolaty bad boy.

The instructions for making the ganache are given last as covering the cake with this divine mixture is the last stage of the cake. However, as the ganache needs to cool before using, it’s actually a good idea to make it first, or around the same time as you make the sponge.

Totally Chocolaty Birthday Cake

For the cake:

  • 225g butter, softened
  • 225g caster sugar
  • 4 eggs
  • 50g cocoa, sifted
  • 175g self raising flour
  • half tsp baking powder
  • 2 tsp vanilla extract
  • 1 tbsp golden syrup
  • 1 – 2 tbsp milk

Heat the oven to 175C and grease and line 2 8″ cake tins with greaseproof paper. In a large bowl, cream together the butter and sugar until light and fluffy. Beat in two of the eggs until well mixed and smooth. Add the cocoa and a bit of the flour and mix again, scraping down the sides of the bowl to make sure everything is being well incorporated. Beat in the third and fourth egg, then the remaining flour and baking powder, then the vanilla and syrup, and finally slowly add the milk, mixing until you get a soft batter that drops easily off a spoon. Divide the mixture as evenly as possible between the two prepared tins, flattening it out with a spatula. Bake for 25 – 30 minutes – the cake is done when the middle springs back when lightly pressed with your finger, a skewer comes out clean and it’s beginning to come away from the sides of the tin. Remove from the oven and cool on a wire rack. Once completely cool, remove the greaseproof paper and cut in half with a large, serrated (bread) knife. You now have your four layers ready for filling and covering!

For the white chocolate buttercream:

  • 200g butter, softened
  • 400g icing sugar, sifted
  • 1 tsp vanilla extract
  • 200g white chocolate

If you have a free standing mixer or electric hand whisk, I’d suggest using it for this.

In a large bowl, beat together the butter, sugar and vanilla (start slowly to try and avoid covering your kitchen in icing sugar). Beat for longer than you think you need to – this way you’ll get a lovely soft, lightly whipped textured buttercream. Melt the white chocolate (either in a bowl set over a pan of simmering water, or very carefully in a microwave in bursts of 20 seconds, stirring in between). Allow the chocolate to cool a little before adding to the buttercream and give it a really good beating to make sure it’s well mixed.

Place one of your layers of cake on a cake board or whatever serving plate you’re planning on using. Dollop about a third of the buttercream on and use a palatte knife to spread it out to the edges in an even layer. Add another layer of cake, taking a little time to make sure it’s on straight and pressing down lightly to secure it. Repeat the process with the buttercream and cake layers until you have all four layers of cake sandwiched together with three generous layers of buttercream.

For the chocolate ganache:

  • 300ml double cream
  • 500g milk chocolate, chopped
  • 1 tsp vanilla extract
  • small pinch salt

Warm the cream in a medium sized saucepan until just under boiling point, a few small bubbles at the edge of the pan are fine. Turn off the heat. Add the chopped chocolate and stir into the cream with a spatula until completely smooth and no lumps of chocolate remain. Add the vanilla and a very small amount of salt (sea salt for preference over table salt) and mix well. Allow to cool completely, stirring occasionally. The mixture will become thick, but spreadable.

Dollop most of the mixture on the top of the cake, then use a spatula or large palatte knife to smooth it out to the edges and down over the sides (this video will show you how far better than I can explain it!). If you want a really shiny finish, dip your metal palatte knife in hot water, dry it on paper towel and use the hot knife to smooth the surface of the ganache.  Decorate however you wish – I melted a little white chocolate and piped the birthday boy’s name and age, but be as creative and flamboyant as you feel befits whoever the cake is for!

Max's Chocolate Birthday Cake

Chocolate makes the perfect birthday cake, whatever age!


I have plenty of cake recipes that would all make wonderful birthday cake, click here to check them out.

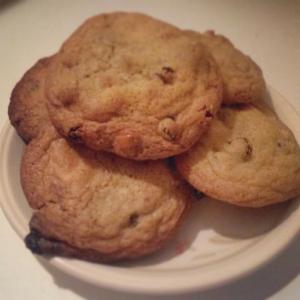
Fully Loaded Favourite Cookies

Fully Loaded Favourite Cookies

Cookies, stuffed full of raisins, milk and white chocolate and toasted hazelnuts

Inspiration for new bakes can come from all kinds of places, but I never thought the One Show (don’t judge me, my landlord watches it) would lead me to bake such a cracking cookie. They did one of their scintillating features on biscuits – the science of dunking, the nation’s favourite biscuit – all that need-to-know stuff. Anyway, they made some biscuits with the nation’s favourite ingredients – chocolate, raisins and hazelnuts – and apparently they were really rather good. So I decided I’d have a bash at something like it myself and here’s the result.

The hazelnuts keep the cookies from being overly sweet, what with all the chocolate and raisins in there. If you can’t get hold of toasted hazelnuts, put them on a baking tray in a hot oven for about 5 minutes. You can then get the papery skins off quite easily by rubbing them with a clean tea towel or some kitchen paper, but it doesn’t matter too much if you don’t remove the skins.

Fully Loaded Favourite Cookies

Ingredients:

  • 120g butter, softened
  • 100g soft, light brown sugar
  • 60g caster sugar
  • 1 egg
  • 1 tsp vanilla extract
  • 190g plain flour
  • half tsp bicarbonate of soda
  • small pinch salt
  • 50g raisins
  • 50g milk chocolate (drops, or chopped into smallish chunks)
  • 50g white chocolate (drops or chopped)
  • 50 toasted hazelnuts, chopped a little

Heat the oven to 190C. In a bowl, or in a freestanding mixer, cream together the butter and sugars until fluffy and light. Add the egg and vanilla and beat well until well incorporated.  Add the flour, bicarb and salt and give another good beating so that you have a thick, sticky cookie dough with no lumps of flour. Chuck in the raisins, both types of chocolate and the nuts and give a good stir so that everything is well distributed in the dough.

You’ll need a couple of baking trays. Use your fingers to pinch off a lump of dough and roll roughly into a ball shape, about the size of a gold ball. Place the balls on the baking sheet, well apart as they will spread as they cook. I only got 4 to a baking sheet – you can always cook them in batches. Bake in the oven for 10-15 minutes. They’re done when golden, but should still be soft to the touch as they’ll firm up as they cool and it’s better to under-bake a cookie so you get that soft, chewy middle. Leave to cool on the tray for a few minutes before transferring to a wire rack to cool (eat one while they’re warm – lush!).

I made 8 cookies with just over half the dough. Cookie dough freezes brilliantly, so just put any that you don’t use in a freezer bag, sling it in the freezer and then the next time you want a quick batch of cookies take the bag out and leave it on the kitchen counter – it’ll be ready to use in about 30-40 minutes!

For more of my cookie and biscuit recipes, take a look here.

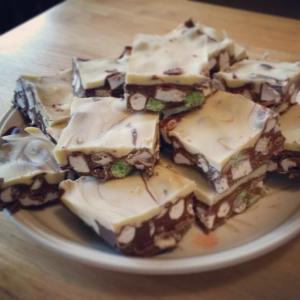
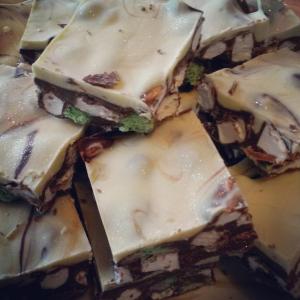
Snow-topped Minty Rocky Road

Snow-topped Minty Rocky Road

Snow-topped Minty Rocky Road – easy to make and very easy to enjoy eating!

I’m mostly getting into the Christmas spirit through the feasting aspect (always my favourite part of any festivities). I think these easy treats would make lovely little gifts, prettily bagged-up when visiting people over the Christmas season. A word of warning; go easy with the peppermint essence or flavouring – a few drops should be plenty, taste as you go and you can always add more, but if you’re heavy-handed it can get a little toothpasty tasting!

Snow-topped Minty Rocky Road

Ingredients:

  • 450g milk or plain chocolate (or a combination of the two)
  • 70g butter
  • small pinch salt
  • 3×4 finger mint KitKat biscuits (or other mint chocolate biscuits of your choice)
  • 150g mini marshmallows
  • 1 large packet mint Aero balls (or get some of the bars and chop them into chunks if you can’t find the balls)
  • 300g white chocolate
  • a few drops peppermint essence or flavouring

Grease and line a high-sided baking tray (approx 22x25cm) with greaseproof paper. In a heat proof bowl over a pan of simmering water (making sure the bowl doesn’t touch the water), melt the milk/plain chocolate, 50g of the butter and add the salt, stirring occasionally until smooth. Turn off the heat and leave for a few minutes to cool a little. Chop the mint biscuits into chunks and add them to the chocolate mix, along with the marshmallows and mint chocolate Aero balls, stirring to ensure everything gets coated; be as brief as possible to avoid the Aero balls melting too much. Scrape into the prepared tin and smooth into the corners so you have an even layer, but still lots of lumps and bumps – this is Rocky Road after all! Leave to cool in the fridge for about half an hour or longer so the top is set.

Following the same method of melting in a bowl over simmering water, melt the white chocolate along with the remaining 20g butter, stirring occasionally until smooth. Remove from the heat and add a couple of drops of mint essence, stir it through and taste a little to see if you think it’s minty enough. Add more, a drop or two at a time until it’s to your taste. Allow to cool slightly before taking the tin from the fridge and pouring the white chocolate on top, trying to coat as much of the surface as possible whilst pouring. Tilt the tin or use a spatula to carefully spread the white chocolate evenly, trying to get as little of the brown chocolate showing through on top. Return to the fridge for a few hours to set completely.

When ready to serve or bag up as presents, remove from the fridge. If you have any white edible glitter, give the top of your snowy rocky road a frosty dusting. Remove from the tin and peel away from the greaseproof paper. Cut into squares and get stuck in.

Christmassy Snow-topped Minty Rocky Road

Double chocolate and minty goodness

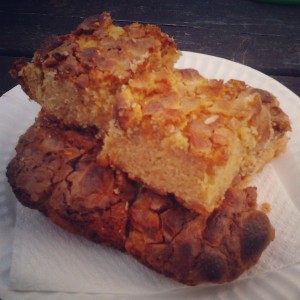
Lemon Meringue Blondies

Lemon Meringue Blondies

Lemon Meringue Blondies

I know, I know; I’ve been using lemon in my bakes a lot recently. But it’s so gloriously hot and they lend such sunshine bright flavour that I just can’t help myself. So here’s my latest lemony lip-smacker – a spongy, gooey, chewy delight that isn’t too heavy in this heat.

Lemon Meringue Blondies

Ingredients:

  • 200g butter (plus a little for greasing)
  • 200g white chocolate
  • 3 eggs
  • 150g soft brown sugar
  • 150g caster sugar
  • 200g plain flour
  • 1 tsp vanilla extract
  • 2 lemons
  • 40g ready made meringue (I used shop bought mini meringues)
  • 3 tbsp lemon curd

Heat the oven to 170C and butter and line a tin (approx 25x22cm) with greaseproof paper. Gently melt the butter in medium saucepan (you don’t want it to brown, just to become liquid). Turn off the heat and add 100g of the white chocolate and stir until melted.

In a large bowl whisk together the sugars and eggs until light and fluffy. Add the flour and the melted butter/chocolate and fold in until well combined. Add the vanilla and finely grated zest and juice of the lemons and stir through. Chop the remaining 100g white chocolate into chunks, crumble the meringue and scatter both over the batter, giving a final stir before tipping the whole mixture into the prepared tin. Dollop the lemon curd on top in a few places then ripple through the uncooked blondie with a skewer or the end of a teaspoon.

I baked this for 50 minutes, but I covered it with foil after half an hour to stop it from browning too far. The top should crack, like a brownie does, and it should feel firm but with a little give as it should be very moist inside – a skewer inserted should come out mostly clean with just a little goo. Remove from the oven and leave to cool, uncovered, before cutting into portions to serve.

Strawberry Milkshake Blondies

Strawberry Milkshake Blondies

Strawberry Milkshake Blondies with White Chocolate Chunks

I’ve been wanting to bake something strawberry milkshake flavour for ages. Today, I did it. I had half a punnet of strawberries in the fridge, some milkshake powder and white chocolate in the cupboard so I settled on blondies. Today the sun is shining (for once) and I’m going to take these little bites of summer to a barbeque.

Strawberry Milkshake Blondies

Ingredients:

  • 200g strawberries chopped into chunks
  • 200g butter (plus a little for greasing)
  • 200g white chocolate
  • 3 tbsp strawberry milkshake powder
  • 3 eggs
  • 150g soft brown sugar
  • 150g caster sugar (plus 1 tbsp for the strawberries)
  • 200g plain flour

Heat the oven to 170C and butter and line a tin (approx 25x22cm) with greaseproof paper. Warm the strawberry chunks and tablespoon of sugar in a saucepan until the sugar is just melted and the strawberries are beginning to release their juices. Remove from the heat and set to one side.

Melt the butter in a bowl over a pan of simmering water. Add the milkshake powder and 100g of the white chocolate and stir until everything is melted and combined (it might separate a bit on standing but don’t worry). Turn off the heat.

In a large bowl whisk together the sugars and eggs until light and fluffy. Using a spatula, stir in the flour and melted butter/chocolate mixture until everything is well combined. Pour into the prepared tin. Chop the remaining chocolate into chunks and scatter over the surface of the brownie batter. Follow by scattering the strawberry chunks, reserving as much of the juice as possible. Place in the oven and bake for 40-50 minutes – they’re done when brown on top but still a little gooey if you insert a skewer. Remove from the oven and drizzle over the remaining few spoons of strawberry juice. Leave to cool in the tin before turning out and chopping into squares.