Tag Archives: gluten-free

Gluten-Free Chocolate Orange Christmas Pudding

Gluten-Free Chocolate Orange Christmas Pudding

Gluten-Free Chocolate Orange Christmas Pudding – the BEST Christmas pudding ever!

I’ve always loved Christmas pudding, even as a kid and this is the BEST I’ve ever had; think traditional Christmas pud crossed with a Terry’s Chocolate Orange (in a good way, naturally). Because the boozy back notes are being provided by liqueurs rather than brandy or rum, the chocolaty, fruitiness is amplified to delicious effect. If you’re not concerned about making this recipe gluten-free, you can simply use regular breadcrumbs and flour.

Making this is actually dead simple, but the cooking requires some knowledge of how to properly steam a pudding so this post is a bit longer than usual with extra pictures that will hopefully be helpful; whilst I already knew how to steam a pudding, I was banging on about making my pud over on Twitter and the friendly folk from Mason Cash sent me this video which you might find useful if you’ve never done it before.

A few things to bear in mind before embarking on making this pudding: creme de cacao isn’t the easiest liqueur to get hold of, but there are online retailers that sell it, or you could see if you can buy a couple of shots from your local cocktail bar (I got my bottle of the stuff whilst on holiday), or if you can find another chocolate liqueur (not cream based) then use that; you’ll need to be at home for eight hours while your pudding steams in order to make sure that the pan doesn’t boil dry, so plan ahead when you’re going to do this and steep your fruit the day/night before; you’ll need a 1.5 litre pudding bowl, either plastic or a heat proof glass bowl (Pyrex or similar); you’ll also need a large enough saucepan for the pudding bowl to fit in, with a little extra room so you can rest it on a trivet or jam jar (to keep the bowl off the bottom of the pan) and still get a lid on it; so yes, you also need a small metal trivet or a jam jar too; to cover your pudding bowl you’ll need greaseproof paper and foil, and some string to secure it to the bowl.

Gluten-Free Chocolate Orange Christmas Pudding

Ingredients:

  • 150g glace cherries, chopped
  • 100g dried apricots, chopped
  • 100g sultanas
  • 20g dried, mixed peel (if you happen to have it, don’t buy it especially for this recipe)
  • 1 tbsp orange liqueur (I used Cointreau, but Grand Marnier or similar is fine)
  • 4 tbsp creme de cacao
  • 2 oranges
  • 100g butter, softened
  • 100g soft dark brown sugar
  • 100g caster sugar
  • 2 large eggs
  • 75g gluten-free bread crumbs
  • 75g gluten-free plain flour
  • 2 tsp mixed spice
  • 200g dark chocolate, chips or chopped into small chunks
  • 50g chopped almonds

The day or night before you’re going to steam your pudding, put the cherries, apricots, sultanas, peel (if using), finely grated zest and juice of both oranges and the liqueurs in a bowl. Cover and leave to soak overnight.

On the day of pudding making, put the butter and sugars in a large bowl and cream together. Then beat in the eggs, followed by the breadcrumbs, flour and remaining ingredients, mixing together until well combined. Add the boozy fruit to the bowl and give a final mix. Your raw pudding mixture is now ready for steaming.

Preparing to steam – you’ll need:

  • 1.5 litre (or larger) heat proof pudding bowl
  • a little butter or oil
  • greaseproof paper
  • tin foil
  • string
  • scissors
  • a small metal trivet or clean jam jar lid
  • large saucepan with lid

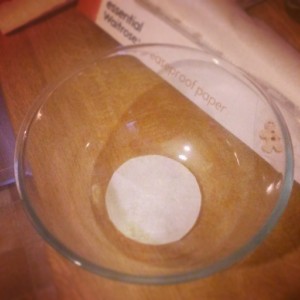
Lightly grease the inside of your pudding bowl and put a small disc of greaseproof paper in the bottom – this will help the pudding to come out of the bowl when it’s cooked.

Greaseproof paper in the pudding bowl

Greaseproof paper in the pudding bowl makes it easier to get the pudding out when cooked

Pour and scrape your pudding mixture into the bowl, smoothing it out as much as possible. Take a large sheet of greaseproof (big enough to comfortably cover the top of your pudding bowl with an over-hang all around) and a sheet of tin foil around the same size. Lay the foil over the greaseproof and make a pleat down the centre of both – this is to allow room for expansion as the pudding steams (see the video for a demonstration of how to do this). Place the paper/foil over the top of the bowl and secure tightly with the string. Trim any excess paper and foil.

Place your trivet or jam jar lid in the centre of the bottom of the saucepan – this is to keep the bowl off the bottom of the saucepan. Tear off a long strip of tin foil, long enough to go under your pudding bowl with over-hang – you’re going to use this a bit like a sling to lift the pudding out of the saucepan eventually. Fold the foil lengthways several times to make it stronger and lay it in the saucepan across the centre so it rests on top of the trivet or jam jar lid.
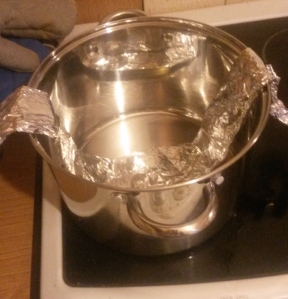
Saucepan prepared for pudding steaming

Saucepan prepared for pudding steaming; a jam jar lid or trivet to keep the bowl off the base of the pan and a strip of foil to lift the bowl out once the pudding is cooked

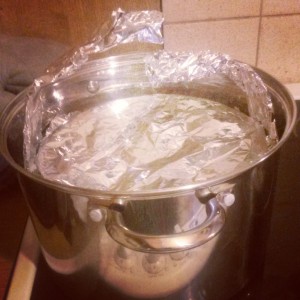
Carefully place the pudding bowl in the saucepan, on top of the lid and foil. Fold the edges of the foil sling over the top of the pudding bowl so that you’ll be able to get the lid on the saucepan. Boil a kettle full of water and pour the hot water into your saucepan so it comes to around two thirds up the pudding bowl, turn the heat on under the saucepan and put the lid on, bringing the water to a boil again.

Pudding in the saucepan

Pudding in the saucepan, boiling water in and lid on and it’s ready to steam for 8 hours!

Your pudding is now steaming! Steam for 8 hours, regularly topping up with more boiling water so that it never boils dry (aim to keep the water level between a quarter and two thirds up the bowl, not less or more – I topped up around every 45 minutes).  After the eight hours steaming are up, you can remove the pudding from the saucepan using the foil sling. Allow to cool completely before removing the greaseproof/foil lid.

To store your pudding, cover with clean, dry greaseproof or foil and secure tightly with string. Leave in a cool, dark place (it doesn’t need to be refrigerated) until you need it.

To reheat, you can: steam again, following the same instructions as before, for around three hours, or; remove it from the pudding bowl, put it in an oven proof tray, loosely covered with foil and heat in moderate oven (around 150C) for about an hour, or; remove from the pudding bowl, place on a microwavable plate, cover with cling film with a couple of holes pierced in and heat on medium, in bursts of 2-3 minutes until piping hot all the way through (don’t just whack it on high or leave it in for ages, it could burn easily as it has such a high sugar content).  However you choose to reheat it, always ensure it’s hot all the way through before serving and never reheat more than twice.

I know this sounds like hard work, but it isn’t really. The most complicated bit is the greaseproof/foil lid and that’s hardly rocket science. The rest is just being around to keep an eye on things. This pudding is so much nicer than even the most luxury of puddings we’ve had from supermarkets and I think making it yourself for such a special occasion is incredibly rewarding. But if you think it’s just a little too much work, check out some of my other Christmas recipes and give one of those a go.
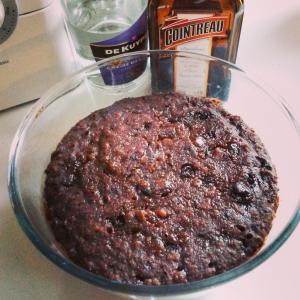
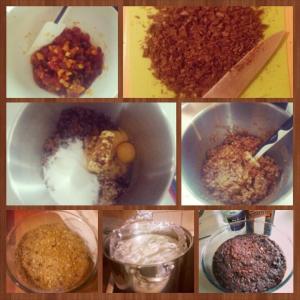
The making of the Christmas Pudding!

The making of the Christmas Pudding!

Chocolate Clementine Cake

Chocolate Clementine Cake

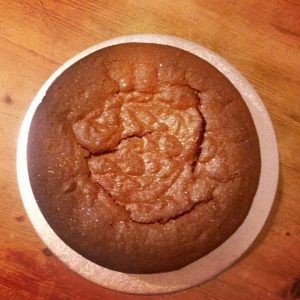
Chocolate Clementine Cake; it’s practically health food!

I can’t take all the credit for this cake as it’s adapted from a Nigella Lawson recipe for clementine cake. I made this version for my cousin’s birthday; she’s a nutritionist and the fact this cake is wheat-free, gluten-free, dairy-free and free from added fat means you could almost convince yourself it’s healthy! As it’s made with ground almonds it stays wonderfully moist, and with the addition of cocoa it’s almost truffle-like – serve with a little cream and you’ve got yourself an excellent dessert.

Chocolate Clementine Cake

Ingredients:

375g clementines (probably 4-6 clementines depending on size)
230g ground almonds
240g caster sugar
40g cocoa, sifted
6 eggs
1 tsp baking powder

Firstly, don’t worry if your clementines are a little more or less than 375g, just don’t go cutting a bit off to make the right weight, they should be whole for the first stage. Boil the clementines for 2 hours, topping up the water as necessary to make sure they don’t boil dry. After the two hours are up, remove from the pan and allow to cool before cutting in half to remove any pips and any stalk.

Heat the oven to 190C and grease and line an 8″/21cm springform tin. If you have a food processor, chuck in all the clementines (skin  and everything) and whizz them up into a fairly smooth pulp. If you don’t have a food processor then blend or very finely chop and the fruit, trying not to lose any of the liquid, then tip it all into a large bowl. Add the rest of ingredients to the food processor or bowl and mix well. Pour the batter into the prepared cake tin and bake for about an hour, covering the top with foil after about 40 minutes to avoid burning. The top will crack, don’t worry. The cake is done when it springs back when pressed and a skewer comes out clean. Remove from the oven and allow to cool completely whilst still in its tin on a wire rack.

Gluten-Free Chocolate Cupcakes with Peanut Butter Buttercream Icing

Gluten-Free Chocolate Cupcakes with Peanut Butter Buttercream

Naughty little treat – Gluten-Free Chocolate Cupcakes with Peanut Butter Buttercream

It’s National Cupcake Week (that’s a real thing, right?) so cupcake baking is happening all over. I used to make cupcakes a lot when I worked in a big office (no squabbling over who gets the biggest slice of whatever treat you’ve taken in), but not so much these days. There’s only one cupcake recipe on here so far, lovely Vanilla Cupcakes that have a secret jam filling; a simple classic. I’m happy to be adding another now, which also has a classic flavour combination of chocolate and peanut butter.

This recipe was born out of wanting to thank a friend for a favour. She sticks (mostly!) to a gluten-free diet, but if you didn’t need to worry about that you could just substitute the gluten-free flour for normal self-raising flour. I have to say, the cakes in this recipe are good, but they’re really a way to justify eating the buttercream, which is (though I say it myself) awesome.

Gluten-Free Chocolate Cupcakes with Peanut Butter Buttercream Icing

For the cupcakes:

  • 125g butter, softened
  • 50g soft dark brown sugar
  • 75g caster sugar
  • 2 large eggs
  • 25g cocoa powder, sifted
  • 100g gluten-free self raising flour
  • 1 tsp vanilla extract
  • 1 tbsp golden syrup
  • 2 tbsp milk

Heat your oven to 170C and line a muffin tray with cupcake cases. In a large bowl, cream together the butter and sugars until fluffy and the colour of a milky coffee. Add the eggs and beat again. Tip in the sifted cocoa and flour and mix until everything is well combined. Stir in the vanilla, syrup and milk and then spoon (or use an ice cream scoop for perfectly even portions) the batter into the prepared cases. Bake for 15-20 minutes; they’re done when a skewer inserted comes out clean and they have a little spring back when lightly pressed with a fingertip. Remove from the oven and carefully remove the cakes from the muffin tray to cool on a wire rack as soon as possible (I use a palatte knife to ease them from the tin); if you leave them to cool in the tin then they have a habit of peeling away from the paper cases.

For the buttercream:

  • 140g butter, softened
  • 280g icing sugar, sifted
  • 1 tsp vanilla extract
  • 4 tbsp smooth peanut butter

In a large bowl, mix the butter and icing sugar together. I find it helps to mix them with a wooden spoon to begin with as it means the icing sugar is less likely to leave your kitchen like it’s been in a blizzard. Once they’re combined, go at it with an electric whisk and then continue to beat for a good 3-5 minutes longer than you think you need to. Trust me; this will leave you with far smoother, fluffier, creamier buttercream than you thought you could achieve. Then add the vanilla and peanut butter and beat again.

When the cupcakes are completely cool, ice them with the buttercream using a palatte knife, or if you’re any good with a piping bag, give them a pretty swirl. If you feel like it, and you have some knocking around, grate a little chocolate over the top of the finished cupcakes. Feed them to your gluten-free loving friends and bask in the warm glow of their appreciation!

Gluten-Free Shortbread

Gluten-Free Shortbread

Buttery, crumbly gluten-free shortbread

Today, the very lovely Alice came to help me improve my blog (yes, this one you’re reading) as she is a whizz with all things wordy and bloggy. To show my appreciation for generously taking time out of her day off, I made her some shortbread. Alice’s is the queen of gluten-free (she’s editor of The Gluten-Free Dining Guide) so I made GF shortbread, but you could substitute normal plain wheat flour for the rice flour if you’re not bothered about sticking to a gluten-free diet. Keep the corn flour though, as it helps give your biscuits a short, crumbly texture.

Gluten-free shortbread

Ingredients:

  • 125g caster sugar
  • 100g corn flour
  • 160g rice flour
  • 175g butter
  • 1 tsp vanilla extract

Sift together the sugar and flours. Add the butter and rub together with your fingers tips until you’re beginning to get a breadcrumb texture, then add the vanilla and continue to mix and squeeze the mixture until it all comes together as a ball. Roll your dough into a sausage about 2 inches in diameter, wrap in cling film and refrigerate for 30 minutes to an hour.

Line a couple of baking trays with greaseproof paper. Take your chilled biscuit dough from the fridge and unwrap it. Use a sharp knife to cut into discs about 1cm thick and transfer to the prepared baking sheet. Make sure you leave some space in between as they will spread a bit. Chill the biscuits again for about 20 minutes whilst you heat your oven to 150C. Bake for 15-25 minutes (it will depend on the size/thickness of your biscuits how long they take), they should be a pale golden colour when done. Allow to cool on the tray as they’ll be soft when you first take them out of the oven. You can either leave them plain, dust with icing sugar or even drizzle them with melted chocolate!

Gluten-Free Lime & Coconut Cake

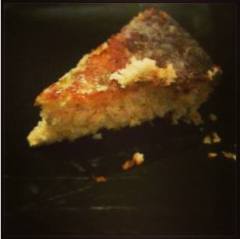
gluten-free lime and coconut cake

Gluten-Free Lime and Coconut Cake

Last week I went to #DrunkTaco night (basically an excuse to eat a ton of incredible meaty tacos and drink gin) with some lovely ladies, two of whom are intolerant to gluten. As if the evening wasn’t decadent enough I decided to up the ante and bring cake. I’ve made a few gluten-free cakes before – it really doesn’t make much odds with cakes in the way it does with bready products – and this was a good excuse to give something new a go. To be vaguely in keeping with the Mexican theme, I came up with a lime and coconut cake, adapted from my usual lemon drizzle cake. If you’re not bothered about keeping this gluten-free you could use normal plain flour, or self raising flour and leave out the baking powder and bicarb.

Lime & Coconut Cake made with Gluten-Free Flour

Ingredients:

  • 115g soft butter
  • 140g caster sugar
  • 170g plain gluten-free flour – I used rice flour
  • 5 limes
  • 100g desiccated coconut
  • 1 tin coconut milk (you may not need the whole tin, but make sure it’s well mixed and not separated into solids and clear liquid)
  • 2 large eggs
  • 2 tbsp milk
  • 100g icing sugar

Grease and line the base of a 9″ spring form cake tin. No need to pre-heat your oven, this cake mix goes in to a cold oven. If you have a food processor that’s the easiest way to make this cake, otherwise a mixer or good old fashioned elbow grease will work just as well. Firstly, finely grate the rind of 4 of the limes into the food processor or a bowl. Then juice the limes into a separate bowl and add the desiccated coconut and 6 tablespoons of the coconut milk – mix well.

In the food processor or mixing bowl with the lime rind, add the butter, sugar and flour and mix well, scraping down the sides if necessary. Add the eggs, followed by the lime juice and coconut mixture and beat again. You want to achieve a soft dropping consistency, so if the mix is a bit thick, add the milk and beat again until incorporated. Pour the cake batter into the prepared tin and put into the oven at 175C for about an hour. Check it at 50 minutes – when it’s ready it’ll be coming away from the sides of the tin and spring back when lightly pressed; a skewer should come out clean. Leave it in the tin during cooling.

About 10 minutes before your cake is due to come out of the oven, heat together in a pan the icing sugar, juice and finely grated rind of the remaining lime and 1 tablespoon of coconut milk. You want this mix to be slightly thick and syrupy so you may need to boil it for a few minutes. When you take your cake out of the oven, and whilst cake and syrup are both still warm, prick your cake all over with a skewer or fork and spoon the syrup over so it seeps into the holes. Leave to cool and set before removing from the tin to serve.

Once again, I failed on the photo front, but luckily one of my lovely friends (thanks, Nicole) got a shot. I promise I’ll improve with the pictures!

If you’re interested in eating good gluten-free food, check out The Gluten-Free Dining Guide blog, or @gfdining on Twitter.