Category Archives: Uncategorized

Happy blog birthday to me!

Rainbow cake to celebrate my blog's first birthday

Rainbow Cake

Not a recipe this one. Just a bit of a thank you, really. I’ve been writing this blog for a year now, and it makes me really happy. As much as anything it’s a great way for me to keep my recipes, but I do enjoy sharing my baking and this way I get to share it with all of you who read it.

Along the way, even before I started, there’ve been some people who’ve been super supportive and encouraging. I want to say a little thank you to a few. They’re all lovely folk, and you could do worse than follow them (on Twitter) or check out their blogs.

Firstly, The Ginger Bread Lad, one of my favourite baking bloggers, who was always so nice about my baking on Twitter and suggested I give blogging a go. Definitely one to watch, this one – I expect big things from him in the future. Have a look at his recipes here.

Then there’s Alice. Lovely Alice. Encouraging me to blog doesn’t really cover it. Nagged. Pestered. Bullied. Even came round my house and helped me get it working properly and gave me a 101 in WordPress. If you’re lucky enough to know Alice (and if you live in Brighton, I’d be surprised if you don’t, networking queen that she is), then her generosity of spirit knows no bounds. She’s also a good excuse for me to come up with more gluten-free baking. Check out her Gluten-Free Dining Guide.

The delightful Arusha Elworthy lent her magnificent skills by creating my logo. I particularly love my little pink-haired, leopard-aproned baker (me in cartoon form, even though my hair is no longer pink). Thank you for making me look so adorable!

My most unusual recipe to date has to be my Gluten-Free Bacon and Peanut Butter Brownies, created for the Pork Princess herself, Nicole ‘Snafflepuss’ Healing. She was even kind enough to re-blog my recipe on her blog, where you can find plenty of good stuff to read about all sorts of things. She’s also a marvellous yoga buddy.

Speaking of buddies, Hannah is my good Bake Club buddy. And she’s a dab hand with the old crochet hook, crafty mare, and made me the most amazing birthday present of some beautiful pink lips and a cake, which I proudly wear daily and get lots of compliments on. That’s them in the picture below. See how clever she is?! Oh, and she guest-blogged some tasty little biscuits.

Beautiful crochet brooches, handmade for my birthday by Hannah.

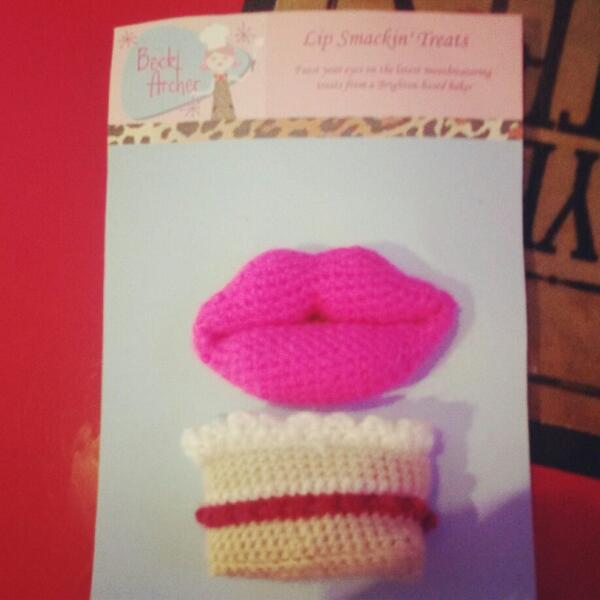
Birthday lips and cake

Endless encouragement and offers of help come from my favourite glamour-nerd on the street, Amy Blackburn. I’ve known and loved her long time, and I’m inspired and delighted by her success setting up her own business. If you like geeky, comic book stuff and super cute clothes then Geek La Chic is the place for you.

A few friends in Twitter-land, who I hope one day to meet for real, also deserve mentions for all their retweets, confidence boosting and even trying out my recipes. Thank you Faye, Dodie, Mike, Jacquie (perhaps better known as Bite Me Brighton) and Julie – you’re all awesome and deserve a huge slice of cake.

Whilst there’s no recipe this time, I did make myself a big old blog birthday cake. I would have blogged it, but honestly, though it looks pretty good in the picture there were a few disasters with this along the way. You’re bound to find a decent recipe for rainbow cake online, and I know that Holiday Baker Man is kindly willing to share his expertise if you are brave enough to give one of these mammoth cakes a go. Still, for all its issues, it didn’t half look impressive when I cut a slice!

There are plenty more people I probably should have thanked (ooh it’s all gone a bit awards ceremony speech), but I don’t want to run the risk of boring anyone so much they never come back to look at my recipes. So to all of you who’ve ever read my little blog – thank you!

Seven layers of colourful cake

Rainbow birthday cake


Brilliant Mini Creme Egg Brownies

Choc full of chocolate and Cadbury's mini Crème Eggs, my brilliant brownies.

Choc full of chocolate and Cadbury’s mini Crème Eggs, my brilliant brownies.

I know it’s not that long ago I posted a brownie recipe, but these are an awesome Easter treat so with a week to go until the day when it’s socially acceptable to eat chocolate for breakfast, I thought I’d share. You could easily leave out the mini Creme Eggs when they disappear from our shelves for another year – the brownie itself is spectacular, with most people I’ve given them to agreeing they’re the best they’ve tried.

Brilliant Mini Creme Egg Brownies

Ingredients:

  • 200g butter
  • 200g dark chocolate, broken or chopped into chunks
  • half tsp salt (UNLESS you’re using salted butter, in which case none at all)
  • 4 eggs
  • 200g caster sugar
  • 150g soft brown sugar
  • 100g plain flour
  • 50g cocoa, sifted
  • half tsp baking powder
  • 200g Cadbury’s mini Creme Eggs

Heat the oven to 180C and line a tin approx 25x20cm with tin foil or baking paper. In a saucepan over a low heat, melt the butter until just liquid (you’re not aiming to colour the butter at all. Remove from the heat and stir through the chocolate until melted and combined with the butter.

In a large bowl.  or bowl of your stand mixer if you have one, whisk together the eggs and sugars until increased in volume and a sort of creamy brown colour. Fold in the flour and sugar, making sure you don’t leave any pockets of dry ingredients unmixed. Then pour and scrape in the chocolate and butter mixture and fold this through until you’ve achieved an even colour. Pour into your prepared tin, then stud with the mini Creme Eggs, pushing them in just a little. Bake in the oven for 25 minutes.

MORE CHOCOLATE! Make your brownies even more indulgent with the addition of Cadbury's mini Crème Eggs!

MORE CHOCOLATE! Make your brownies even more indulgent with the addition of Cadbury’s mini Crème Eggs!

The brownie will form a crust that will probably begin to crack, but you can’t test if they’re done the way you do with a cake as the whole point of a good brownie is to be moist, sticky and sodden inside, so don’t be tempted to bake them longer. Remove from the oven and cool completely before cutting into pieces. A small piece of this rich, gooey brownie should be enough to keep any chocoholic in a state of bliss!

Rich and gooey in the middle, studded with sweet surprises of Cadbury mini Crème Eggs

Rich and gooey in the middle, studded with sweet surprises of Cadbury mini Crème Eggs

For more brownie recipes click here. Or change things up a little and check out my blondies.


Chocolate Almond Meringues

Chocolate Almond Meringues

Chocolate Almond Meringues

I’ve not blogged for a while, but it’s not for lack of baking, just lots of other things going on that have kept me from the keyboard. Hopefully I’ll be able to get lots of recipes added in a short space of time to make up for it.

To kick things off, here are some lovely meringues I made when I was cooking dinner for friends recently. I served them with good vanilla ice cream, warm mixed berries (just a bag of frozen ones from the supermarket, heated through with a couple of tablespoons of sugar), salted caramel sauce and chocolate hazelnut sauce. Meringues are great for entertaining as you can make them several days in advance and (once cooled) store them in an air tight container or tin.

Chocolate Almond Meringues

Ingredients:

  • 4 egg whites
  • 200g caster sugar
  • 2 tbsp cocoa powder, sifted
  • 30g dark chocolate, finely grated
  • 1 tsp cornflour
  • 1 tsp vinegar (I used cider vinegar, but white wine or sherry vinegar would be fine)
  • 100g flaked almonds, toasted

Heat the oven to 180C and line two baking trays with greaseproof paper (when the meringue is made, used little blobs of it to secure the paper to the baking trays). Using a stand mixer or electric hand whisk, whisk the egg whites until you get to the stiff peak stage. Still whisking, add the sugar a tablespoon at a time, allowing the sugar to get completely incorporated before adding more. Continue to whisk until all the sugar is mixed in and the meringue is white and glossy.

Add the cocoa and dark chocolate, folding in with either a rubber spatula or large metal spoon. DO NOT use a wooden spoon or other blunt kitchen tool as you’ll lose too much of the air you’ve spent so long adding. You can be quite swift and firm when folding in, but make sure you don’t leave any pockets of dry ingredient unmixed. Sprinkle over the cornflour, vinegar and toasted almonds and fold these through. Dollop mounds on the prepared baking sheets, leaving a little space between as they will spread and settle a little.

Pillowy mounds of glossy meringue

Pillowy mounds of glossy meringue

Place the meringues in the oven and turn the temperature down immediately to 150C. Bake for 45-50 minutes. The meringues will be crisp on the outside, possibly even a little cracked, with a chewy, marshmallowy middle. Remove from the oven and allow to cool and use the same day, or you can store them in an airtight (and completely dry) container for 3 or 4 days.

Crisp outer shell with a chewy, marshmallowy centre

Crisp outer shell with a chewy, marshmallowy centre

To make an easy chocolate sauce, heat 300ml double cream to just below boiling, break in 150g milk chocolate (or a mix of milk and plain) and stir until melted. Add a tiny pinch of salt and, if you have it, a tablespoon or two of liqueur (I used hazelnut, but orange, mint, brandy or Baileys would all be perfect). Allow to cool to room temperature. Pour over almost anything for instant deliciousness!

If you want to make your own salted caramel sauce, I swear by Nigella Lawson’s recipe and you can find it here. And if you want more meringue goodness, take a look at my other recipes.

Lemon Curd and Raspberry Roulade

Lemon Curd and Raspberry Roulade

Lemon Curd and Raspberry Roulade; light, luscious, sweet and sharp

My best friend loves lemon, particularly lemon curd. For our pre-Christmas get-together I decided to make a dessert with some lemon curd; something a bit sharp and zingy to liven up the taste buds when all around is super-stodgy, rich and spicy. I decided on roulade as, though it’s filled with cream, the sweet meringue is light and fluffy inside and the perfect foil to the tart lemon and raspberries. I was incredibly pleased with how this turned out – it’s easily as good as any luxury dessert you’d get at a supermarket – it’d be a brilliant centrepiece pud for a New Year’s celebration.

If you wanted, you could use ready made lemon curd, but make sure it’s the best quality you can afford, made with real lemons, eggs and butter and not full of additives and setting agents. However, making the curd is actually quite simple, gives you a great sense of satisfaction, and there’s plenty left over for toast (or give it as a gift in a pretty jar).

Lemon Curd and Raspberry Roulade

For the lemon curd: (I followed a Nigel Slater recipe)

  • 4 lemons, preferably unwaxed
  • 200g sugar
  • 100g butter
  • 3 eggs and 1 yolk (save the spare white for your meringue)

In a heat proof bowl, over a pan of simmering water (don’t let the bowl touch the water) combine the finely grated zest and juice of the lemons with the sugar and butter, stirring until everything has melted.

Give the eggs and extra yolk a little whisk to mix, then add to the lemon mixture. Mix with a wooden spoon or whisk frequently until the mixture thickens. It’ll feel heavier and be the consistency of custard. Remove from the heat and allow to cool for several hours or overnight (if you’re planning on giving some as gifts then put it in sterilised jam jars at this stage, whilst it’s still hot –  you’ll get a couple of small jars worth with enough left over to make the roulade)

For the meringue:

  • 4 egg whites
  • 200g caster sugar
  • 1 tsp corn flour
  • 1 tsp cider/white wine vinegar
  • a little icing sugar for dusting

Heat the oven to 150C and grease and line a Swiss roll tin or high sided baking sheet (approx 23 x 33cm) with greaseproof paper. Now, to make your meringue it’s really important your bowl is scrupulously clean – if possible use a glass or metal bowl and wipe round the inside with the cut side of half a lemon or a paper towel with a little vinegar on; this should get rid of any grease. Put your egg whites in the bowl and whisk until you get to the stiff peaks stage. Add the sugar a spoonful at a time, whisking all the while. Sprinkle over the corn flour and vinegar and give one last short whisk until everything is combined and glossy. Spoon the mixture onto the prepared tin, smoothing into the corners with a spatula and trying to get a flat, even surface. Bake for 30–35 minutes until the surface of the meringue is just firm. Remove from the oven, let it cool for about ten minutes. Lay a sheet of greaseproof on a board and dust with icing sugar. Once the meringue has cooled a little turn it out onto the board and carefully remove the greaseproof from the base and leave to cool while you assemble the filling.

For the filling:

  • Approx 200ml lemon curd
  • 300ml double cream
  • 1 tbsp icing sugar, sifted
  • 150g raspberries

In a large bowl, whip the cream with the icing sugar until thick – it should cling to the whisk but drop off easily if the whisk is tapped on the side of the bowl. It’s easy to over-whisk cream if you do it with an electric whisk or stand mixer so keep a close eye on it if you use a machine. It doesn’t take long to do with a balloon whisk and a few minutes whisking shouldn’t be too much work for most people. Once it’s the desired consistency, add six tablespoons of the lemon curd and mix well.

Use a spatula to smooth the cream mixture over the cooled meringue, trying to make an even layer and leaving a border of about 1 cm around the edge. Slather with the remaining lemon curd and then scatter with the raspberries. Now for the roll!

Before the big roll! Lemon Curd and Raspberry Roulade

Before the big roll! Lemon Curd and Raspberry Roulade

With the shortest end of the meringue facing you, roll it away, folding over and using the greaseproof paper to try and keep the roll compact. Once it’s fully rolled, place on a serving plate with the fold underneath. Chill in the fridge for a couple of hours before serving as this will help it firm up before you slice into it. It looks beautiful when cut, with swirls of snowy white interspersed with sunny yellow curd and ruby red raspberries. Luscious!

If you love a roulade, take a look at another recipe here, or if lemon meringue pushes all the right buttons how about some blondies or cupcakes?

Boozy Chocolate and Hazelnut Pie

Boozy Chocolate and Hazelnut Pie

Boozy Chocolate and Hazelnut Pie; plenty of festive spirit in this one!

This week was the December meeting of the Bake Club I’m part of and the theme was Boozy Bakes – helpful for getting us all in the festive spirit (sorry, I’m a bit of a pun fan)! Though I rarely drink, I have a fairly extensive array of liqueurs that mostly get used This week was the December meeting of the Bake Club I’m part of. Our theme was for baking. When deciding what to make I recalled making grasshopper pie a while back and thinking there were endless possibilities for other flavour combinations; after a little deliberation I settled on hazelnut and chocolate.

This isn’t a pie in the classic sense of the word, certainly it’s more US inspired than GB, but calling it a tart didn’t seem right somehow. Regardless of the name, it’s delicious; the marshmallow cream gives the filling an incredible texture and the liqueurs make it a distinctly grown-up dessert. My top tip when making this is to melt the marshmallows slowly – too much heat can mean the gelatine from the marshmallows doesn’t work its magic and the filling doesn’t set properly. Other than that, this is super easy to make so give it a go!

Boozy Chocolate and Hazelnut Pie

For the base:

  • 300g bourbon biscuits
  • 50g dark chocolate
  • 50g butter, softened

Chuck all the ingredients in a food processor and whizz them up until they begin to clump. Tip into a tart tin and press down with the back of a spoon, smoothing into the edges and up the sides, trying to make it as even as possible. Place in the fridge and chill until your filling is ready.

For the filling:

  • 125ml full-fat milk
  • 150g mini marshmallows
  • 60ml (4 tbsp) creme de cacao blanc (or other chocolate liqueur)
  • 60ml (4 tbsp hazelnut liqueur (Frangelico or similar)
  • 375ml double cream
  • a few grams dark chocolate to decorate (optional)

Put the milk and marshmallows in a saucepan and melt slowly on a low heat – the milk should never boil, just begin to foam, and you’ll be able to hear the marshmallows foaming as they melt. I can’t stress enough that you should take your time with this stage; keep taking the milk off the heat and stirring the marshmallows to get them to melt without letting the temperature get too high. Once the marshmallows are completely melted, remove from the heat and stir in the liqueurs. Transfer the liquid to a heat proof bowl and leave to cool.

Once cooled, whisk the cream in a large bowl until it’s getting to soft-peak stage. Add the boozy marshmallow mixture and continue to whisk until smooth and thickened – it should be the texture of very soft (Mr Whippy) ice cream. Pour into the biscuit base and smooth out to the edges. Finely grate a little dark chocolate over the top and chill in the fridge for a few hours or overnight before serving.

Gluten-Free Chocolate Orange Christmas Pudding

Gluten-Free Chocolate Orange Christmas Pudding

Gluten-Free Chocolate Orange Christmas Pudding – the BEST Christmas pudding ever!

I’ve always loved Christmas pudding, even as a kid and this is the BEST I’ve ever had; think traditional Christmas pud crossed with a Terry’s Chocolate Orange (in a good way, naturally). Because the boozy back notes are being provided by liqueurs rather than brandy or rum, the chocolaty, fruitiness is amplified to delicious effect. If you’re not concerned about making this recipe gluten-free, you can simply use regular breadcrumbs and flour.

Making this is actually dead simple, but the cooking requires some knowledge of how to properly steam a pudding so this post is a bit longer than usual with extra pictures that will hopefully be helpful; whilst I already knew how to steam a pudding, I was banging on about making my pud over on Twitter and the friendly folk from Mason Cash sent me this video which you might find useful if you’ve never done it before.

A few things to bear in mind before embarking on making this pudding: creme de cacao isn’t the easiest liqueur to get hold of, but there are online retailers that sell it, or you could see if you can buy a couple of shots from your local cocktail bar (I got my bottle of the stuff whilst on holiday), or if you can find another chocolate liqueur (not cream based) then use that; you’ll need to be at home for eight hours while your pudding steams in order to make sure that the pan doesn’t boil dry, so plan ahead when you’re going to do this and steep your fruit the day/night before; you’ll need a 1.5 litre pudding bowl, either plastic or a heat proof glass bowl (Pyrex or similar); you’ll also need a large enough saucepan for the pudding bowl to fit in, with a little extra room so you can rest it on a trivet or jam jar (to keep the bowl off the bottom of the pan) and still get a lid on it; so yes, you also need a small metal trivet or a jam jar too; to cover your pudding bowl you’ll need greaseproof paper and foil, and some string to secure it to the bowl.

Gluten-Free Chocolate Orange Christmas Pudding

Ingredients:

  • 150g glace cherries, chopped
  • 100g dried apricots, chopped
  • 100g sultanas
  • 20g dried, mixed peel (if you happen to have it, don’t buy it especially for this recipe)
  • 1 tbsp orange liqueur (I used Cointreau, but Grand Marnier or similar is fine)
  • 4 tbsp creme de cacao
  • 2 oranges
  • 100g butter, softened
  • 100g soft dark brown sugar
  • 100g caster sugar
  • 2 large eggs
  • 75g gluten-free bread crumbs
  • 75g gluten-free plain flour
  • 2 tsp mixed spice
  • 200g dark chocolate, chips or chopped into small chunks
  • 50g chopped almonds

The day or night before you’re going to steam your pudding, put the cherries, apricots, sultanas, peel (if using), finely grated zest and juice of both oranges and the liqueurs in a bowl. Cover and leave to soak overnight.

On the day of pudding making, put the butter and sugars in a large bowl and cream together. Then beat in the eggs, followed by the breadcrumbs, flour and remaining ingredients, mixing together until well combined. Add the boozy fruit to the bowl and give a final mix. Your raw pudding mixture is now ready for steaming.

Preparing to steam – you’ll need:

  • 1.5 litre (or larger) heat proof pudding bowl
  • a little butter or oil
  • greaseproof paper
  • tin foil
  • string
  • scissors
  • a small metal trivet or clean jam jar lid
  • large saucepan with lid

Lightly grease the inside of your pudding bowl and put a small disc of greaseproof paper in the bottom – this will help the pudding to come out of the bowl when it’s cooked.

Greaseproof paper in the pudding bowl

Greaseproof paper in the pudding bowl makes it easier to get the pudding out when cooked

Pour and scrape your pudding mixture into the bowl, smoothing it out as much as possible. Take a large sheet of greaseproof (big enough to comfortably cover the top of your pudding bowl with an over-hang all around) and a sheet of tin foil around the same size. Lay the foil over the greaseproof and make a pleat down the centre of both – this is to allow room for expansion as the pudding steams (see the video for a demonstration of how to do this). Place the paper/foil over the top of the bowl and secure tightly with the string. Trim any excess paper and foil.

Place your trivet or jam jar lid in the centre of the bottom of the saucepan – this is to keep the bowl off the bottom of the saucepan. Tear off a long strip of tin foil, long enough to go under your pudding bowl with over-hang – you’re going to use this a bit like a sling to lift the pudding out of the saucepan eventually. Fold the foil lengthways several times to make it stronger and lay it in the saucepan across the centre so it rests on top of the trivet or jam jar lid.

Saucepan prepared for pudding steaming

Saucepan prepared for pudding steaming; a jam jar lid or trivet to keep the bowl off the base of the pan and a strip of foil to lift the bowl out once the pudding is cooked

Carefully place the pudding bowl in the saucepan, on top of the lid and foil. Fold the edges of the foil sling over the top of the pudding bowl so that you’ll be able to get the lid on the saucepan. Boil a kettle full of water and pour the hot water into your saucepan so it comes to around two thirds up the pudding bowl, turn the heat on under the saucepan and put the lid on, bringing the water to a boil again.

Pudding in the saucepan

Pudding in the saucepan, boiling water in and lid on and it’s ready to steam for 8 hours!

Your pudding is now steaming! Steam for 8 hours, regularly topping up with more boiling water so that it never boils dry (aim to keep the water level between a quarter and two thirds up the bowl, not less or more – I topped up around every 45 minutes).  After the eight hours steaming are up, you can remove the pudding from the saucepan using the foil sling. Allow to cool completely before removing the greaseproof/foil lid.

To store your pudding, cover with clean, dry greaseproof or foil and secure tightly with string. Leave in a cool, dark place (it doesn’t need to be refrigerated) until you need it.

To reheat, you can: steam again, following the same instructions as before, for around three hours, or; remove it from the pudding bowl, put it in an oven proof tray, loosely covered with foil and heat in moderate oven (around 150C) for about an hour, or; remove from the pudding bowl, place on a microwavable plate, cover with cling film with a couple of holes pierced in and heat on medium, in bursts of 2-3 minutes until piping hot all the way through (don’t just whack it on high or leave it in for ages, it could burn easily as it has such a high sugar content).  However you choose to reheat it, always ensure it’s hot all the way through before serving and never reheat more than twice.

I know this sounds like hard work, but it isn’t really. The most complicated bit is the greaseproof/foil lid and that’s hardly rocket science. The rest is just being around to keep an eye on things. This pudding is so much nicer than even the most luxury of puddings we’ve had from supermarkets and I think making it yourself for such a special occasion is incredibly rewarding. But if you think it’s just a little too much work, check out some of my other Christmas recipes and give one of those a go.

The making of the Christmas Pudding!

The making of the Christmas Pudding!

Devonshire Splits (Cream Buns)

Devonshire Splits, or Cream Buns

Devonshire Splits, a proper, old-fashioned tea-time treat!

My oldest living relative, great aunty Audrey, lives in Australia. She’s visiting the UK for a few months and staying with my mum for most of this trip. I haven’t seen her in about 20 years until this week but she’s hardly changed, is immense fun and a bit of a cheeky character. Apart from being the start of her visit, it was also her 87th Birthday, so naturally I felt the need to contribute to the celebrations in the form of some baking. She and my mum had been trying to order something they remembered from their childhood, what they called ‘Penny Buns’, from my mum’s local baker without success. I did a little online research, discovered that they were talking about Devonshire Splits and found a Nigel Slater recipe to recreate these yummy little cream buns that are filled with whipped cream and jam; a great variation on the scone for afternoon tea.

Devonshire Splits (or ‘Penny Buns’)

Ingredients:

  • 450g plain flour
  • half tsp salt
  • 14g dried easy-bake yeast
  • 2 tsp caster sugar
  • 30g butter
  • 300ml milk
  • extra flour for kneading

Put the flour, salt, yeast and sugar in a large bowl. In a pan, warm the milk and butter until the butter is melted, then allow to cool slightly until it’s hand hot (you’re going to be getting your hands in there and you don’t want to burn yourself or have the mixture too hot to bear).

Pour most of the butter and milk mixture into the flour and mix to form a soft dough; if necessary add more of the milk until it all comes together. The dough should be soft and a little sticky (err on the side of too wet rather than too dry).

Once you’ve got a ball of dough, tip it out onto a floured surface and knead for 5-10 minutes until it feels slightly elastic (you can’t really knead it too much, but you can certainly knead it too little). Put it back in the bowl and cover loosely with clingfilm or a clean tea towel, leaving it to prove somewhere warm for about an hour.

After the proving time your dough should be roughly doubled in size. Turn out on to a floured surface and divide into 8-10 pieces that area all about the same size. Roll each one into a ball and place on a floured baking tray (I used two trays), leaving a little space between each ball. Cover with some lightly oiled clingfilm and leave to rise again for 10-15 minutes. During this time, heat your oven to 200C.

Remove the clingfilm and bake for 18-20 minutes until pale golden. You know they’re done if they sound hollow when tapped on the bottom. Cool on a wire rack.

To serve, cut a deep split and ease apart. Cram full of as much whipped cream and strawberry jam as you dare, and dust with a little icing sugar. A proper old-fashioned treat!

I’ve just discovered these little beauties won the Golden Spoon award this week from The Sunday Bake Club (thanks)! Take a look at their blog here.